 RSS Feed
 Twitter
| File name: |  |
HPHDU.exe [1/1, 4.21M]
|
| System requirements: | | Windows XP(32bit) with Service Pack2 and above Windows Vista (32 and 64 bit) Windows 7 (32 and 64 bit) You must have administrative privileges for your PC |
| Released: | | 2011-10-20 |
| Version: | | 3.0.0.021 |
| Compatibility: | | Microsoft Windows Vista, Microsoft Windows Vista Home Premium (32-bit), Microsoft Windows Vista Home Basic (32-bit), Microsoft Windows Vista Ultimate (32-bit), Microsoft Windows 7 (32-bit), Microsoft Windows 7 Home Basic (32-bit), Microsoft Windows 7 Home Premium (32-bit), Microsoft Windows 7 Professional (32-bit), Microsoft Windows 7 Enterprise (32-bit), Microsoft Windows 7 Ultimate (32-bit), Microsoft Windows 7 Home Basic (64-bit), Microsoft Windows 7 Home Premium (64-bit), Microsoft Windows 7 Professional (64-bit), Microsoft Windows 7 Enterprise (64-bit), Microsoft Windows 7 Ultimate (64-bit), Microsoft Windows 7 (64-bit), Microsoft Windows Vista (64-bit), Microsoft Windows Vista Home Basic (64-bit), Microsoft Windows Vista Home Premium (64-bit), Microsoft Windows Vista Business (64-bit), Microsoft Windows Vista Ultimate (64-bit), Microsoft Windows Vista Enterprise (32-bit), Microsoft Windows Vista Enterprise (64-bit), Microsoft Windows XP |
| Fix/Enhancement: | | Enhancements added in this version of the HP Hardware Diagnostic Utility include: |
Tampilkan postingan dengan label Blingking. Tampilkan semua postingan
Tampilkan postingan dengan label Blingking. Tampilkan semua postingan
HP Hardware Diagnostic Utility v3.0
Canon IP1300, IP1700, IP1200, IP1880, IP1980 error code
Bagi yang memiliki permasalahan pada printer Canon IP1300, IP1700, IP1200, IP1880, IP1980, coba lihat dan hitung gerakan lampu power(hijau) dan stop/reset(orange). Dan cocokkan kombinasinya dengan daftar di bawah ini:
3x orange 1x hijau = mekanik error
4x orange 1x hijau = ink run out
5x orange 1x hijau = cartirdge black/colour bermasalah
7x orange 1x hijau = cartirdge black/colour bermasalah
8x orange 1x hijau = absorber full / direset dengan general tools
12x / 15x orange 1x hijau = cartridge detection
Diharapkan dengan memahami arti dari tanda lampu yang muncul akan lebih mudah dalam mengambil tindakan.
Ink Charge dengan Adjustment Program
Label:
Blingking,
printer,
tinta tidak keluar
4
komentar
Ink charge adalah proses penyedotan tinta yang dilakukan pompa printer untuk memperlancar keluarnya tinta. Pada kasus printer tidak terpakai lama, tinta di dalam head mengendap dan menghambat keluarnya tinta pada saat proses print. Ada sebuah fitur di dalam program Adjustment program yang jarang sekali di bahas.
Untuk software adjustment tersedia di Download Page dalam blog ini. Cari yang sesuai dengan printer anda.

Semoga berhasil!

Untuk software adjustment tersedia di Download Page dalam blog ini. Cari yang sesuai dengan printer anda.

- Buka adjustment program, lalu Yes->Accept
- Pilih model name dan port sesuaikan dengan printer terpasang
- Klik 'Particular adjustment Mode', Scroll ke ---Maintenance---Ink Charge,klik OK.

- Kemudian lakukan inkcharge, ingat! inkcharge menyedot sangat banyak tinta. Lebih baik jika gunakan infus atau tabungluar yang diisi dengan cairan head cleaner.
- Tunggu hingga kira" 15 menit.
- Kemudian lakukan Nozzle check dengan klik pada 'Print', dan lihat seberapa perubahan yang telah dicapai.

Semoga berhasil!
Working T50 and T60 Adjustment Program Resetter
Label:
Blingking,
printer
23
komentar

For every one who require Epson T50 and Epson T60, now 'working' resetter for these epson printers available for download here. Thanks to OrTHoTaMiNe for making this software work fine to everyone needs and absolutely free of charge.
Click here to download 'working' Epson T50/T60 Adjustment program.

or you can view all software here.
How to use adjustment program:
- Download the file, save file to any location on your computer
- Then running adjustment program by click
- Click accept, and click SELECT and select to auto or port detected, then OK
- Click the'Particular adjustment mode' button
- Scroll down to---Maintenace---and double click on Waste Inkpad Counter
- Make 'check' both to Mainpad Counter and Platen Pad Counter
- You can click Check button before, to read both of Counter Value, then make 'check' again and click Initialization to reset the counter value.
- Restart printer, then click OK button.
- Exit program by click Finish button, then Previous page and Quit


error 5200 pada canon ip2270
Label:
Blingking,
printer
0
komentar
Ini trik hasil copas, dan sudah di tes hari ini ( 8 Des 2010) hasilnya, ok! It's Works!
Untuk printer canon yang ngadat dengan kode error 5200, begini caranya :
1. Cabut power pada listrik langsung saat printer masih menyala,
2. Tarik ketengah cartridge secara manual (biasanya cartridge+ rumahnya ada disebelah kanan)
3. lepas pengaman cartridge, lalu lepas semua cartridge.
4. Biarkan pengaman terbuka, lalu hidupkan printer.
5. Setelah itu rumah cartridge akan bergerak ke kanan ke kiri tetapi membentur sisi kanan dan kiri karena pengaman belum ditutup
6. Setelah itu masukkan cartridge kedalam rumahnya,lalu jalankan printernya
7. Selesai. Printer kembali dapat dioperasikan.
selamat mencoba. Semoga sukses!
Manual reset MP145
Error Code CanonMP145/150/160
Resetter EPSON, Canon download page
Untuk printer canon yang ngadat dengan kode error 5200, begini caranya :
1. Cabut power pada listrik langsung saat printer masih menyala,
2. Tarik ketengah cartridge secara manual (biasanya cartridge+ rumahnya ada disebelah kanan)
3. lepas pengaman cartridge, lalu lepas semua cartridge.
4. Biarkan pengaman terbuka, lalu hidupkan printer.
5. Setelah itu rumah cartridge akan bergerak ke kanan ke kiri tetapi membentur sisi kanan dan kiri karena pengaman belum ditutup
6. Setelah itu masukkan cartridge kedalam rumahnya,lalu jalankan printernya
7. Selesai. Printer kembali dapat dioperasikan.
selamat mencoba. Semoga sukses!
Manual reset MP145
Error Code CanonMP145/150/160
Resetter EPSON, Canon download page
SSC Service Utility
Label:
Blingking,
printer
28
komentar
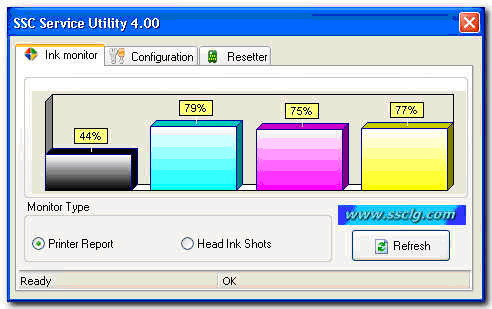
SSC Service Utility allow you to do many amazing things with Your Epson printer :
1) Work directly with CSIC in Epson Stylus printers cartridges.
2) Reset or rewrite any chip using special addon device.
3) Freeze internal ink counters.
4) Reset internal ink counters even with empty cartridges.
5) Separate cleaning of color and black heads for all Epson inkjet printers, powerful cleaning mode.
6) Hot swapping of cartridges supported.
7) Resetting of protection counter (even then it is already full).
8) More then 100 different Epson printers supported
This allow many people with high printing demands to save some money (program works with both black and color cartridges).
Up to day this software works under Windows 95/98/ME/2K2/XP with both the LPT and USB printers.
NOTE ! You can lost Epson lifetime guarantee on print head by refilling ink cartridges!
Latest versions changes:
New in 4.30:
- support for R270
- support for R240
- support for R340
- support for CX2800
- support for CX3900
- support for CX4900
- support for CX5900
- support for C58/C59
- support for RX640
- improved support for C2100/2200
- improved support for RX700
- improved support for R2400
- improved support for 785EPX/825/895/915
- some other improvements and bug fixes
- support for CX4200/CX4700/CX4800/DX4200/DX4800
- support for C47/C48
- support for RX430
- support for CX6500/CX6300
- improved support for CX6400/CX6600
- improved support for RX500/RX510
- improved support for RX600/RX610
- improved support for R1800
- improved support for CX3700/CX3800/DX3800/DX3850
- improved support for C67/C68/D68
- improved support for C87/C88/D88
- support for PM-970C
- support for PictureMate
- support for RX700
- support for R2400
- support for PM-A700
- support for PM-G720
- support for RX520
- support for CX7800
- support for CX4100
- support for DX3800
- support for CX3800/CX3810
- support for CX3700
- support for C67/68 and Photo Editions
- support for C87/C88/D88 and Photo Editions
- support for R220/R230
- support for R320
- support for CX4500
- support for CX3650
- support for CX4600
- support for CX5300
- support for CX5100
- support for RX420
- support for RX425
- support for RX620
- support for R1800
- improved support for almost all other printers
- improved ink freezer
- improved ink monitor, implemented status information
- protection counter reset improvements
- various bug fixes
Download SSCServe 4.30
EPSON Adjustment Program (Resetter) Download Page
Canon Resetter Download Page
resetter canon ip2770
Label:
Blingking,
printer,
resetter canon ip2770
0
komentar
Berikut adalah cara untuk mereset canon ip 2770.
Langkah pertama adalah melakukan manual reset pada printer. Caranya:
1. Cabut AC Cord (sambungan listrik) dan pastikan tidak ada koneksi apapun ke dari printer
2. Tekan dan tahan tombol power, colokkan AC cord.
3. LED hijau menyala, tahan tombol power dan tekan tombol resume dan tahan kedua tombol.
4. Lepas tombol power dan tahan tombol resume, tombol LED berganti kuning.
5. Lepas tombol resume, printer sekarang berada dalam keadaan service mode.
6. Tekan tombol resume 4 kali
7. Matikan printer / cabut AC cord
8. Nyalakan ulang printer
Resetter ip2270 versi downloadable, download
Resetter Canon List on Download Page
Manual Reset Canon MP145
Manual Reset Canon IX4000/IX5000
Cara Reset Samsung ML-1640
Resetter EPSON list
Langkah pertama adalah melakukan manual reset pada printer. Caranya:
1. Cabut AC Cord (sambungan listrik) dan pastikan tidak ada koneksi apapun ke dari printer
2. Tekan dan tahan tombol power, colokkan AC cord.
3. LED hijau menyala, tahan tombol power dan tekan tombol resume dan tahan kedua tombol.
4. Lepas tombol power dan tahan tombol resume, tombol LED berganti kuning.
5. Lepas tombol resume, printer sekarang berada dalam keadaan service mode.
6. Tekan tombol resume 4 kali
7. Matikan printer / cabut AC cord
8. Nyalakan ulang printer
Resetter ip2270 versi downloadable, download
Resetter Canon List on Download Page
Manual Reset Canon MP145
Manual Reset Canon IX4000/IX5000
Cara Reset Samsung ML-1640
Resetter EPSON list
Mereset SAMSUNG ML-1640
Label:
Blingking,
printer
0
komentar
Download Samsung ML1640 EEPROM resetter.
Copasnya copas yang punya jg copas, akhirnya saya copas jg.. Gak apa ya? semoga berguna...
Copasnya copas yang punya jg copas, akhirnya saya copas jg.. Gak apa ya? semoga berguna...

Produsen printer sekarang makin pinter. Kita sebagai maling juga pinter searching, apalagi ada master google.
Samsung ML-1640 generasi printer laser murah meriah. Bandel dan handal utk operasional harian. Namun ada sayangnya, printer ini berhenti bekerja setelah 2100 halaman. Printer akan nge Blink merah terus menerus.. bener-bener nggaplek i..
Kita diharuskan mengganti cartridge nya setiap 2100 agar bisa jalan lagi. wakaakaka… betul-betul strategi marketing yg bagus. Padahal orang indonesia biasa melakukan isi ulang toner selama drum masih bagus.
Bisa dibayangkan ganti cartridge = 750 rb an, sementara isi ulang = 100 rb. Setiap 1000 lembar perlu dilakukan isi ulang atau ganti cartridge… wow…
Oke deh, bagi yg terbiasa isi ulang kita perlu sedikit usaha utk reset ML-1640 ini. Bagi anda yang tidak ingin beresiko dapat di isi ulang di tempat" pengisian toner.
Yang perlu Anda lakukan lakukan hal berikut :
1. Buka cover belakang, cuman membuka dua mur kok.

2. Lihat pada board hijau di sebelah kanan

3. Nah ini dia senjata rahasia kita, kabel kecil..

4. Hubungkan PIN 1 dan 4 pada kaki IC kecil disamping processor

Kalau ingin disoder gpp kayak gambar di atas itu disoder.
Tapi aku sendiri susah utk menyoder barang sekecil itu.. hehehehe (bilang aja gak bakat !!!).
Ya udah kalau gak kepingin ya tinggal dihubungkan saja, lalu hidupkan printer dalam kondisi kabel masih menancap di pin 1 dan 4, selama lebih kurang 15 detik lah. Nanti warna blink akan berubah hijau…
Sekarang Printer Sudah siap.....
EPSON Adjustment Program download Page
Canon Resetter Software
Cara Reset Blingking pada EPSON TX 210 dengan Adjustment Program
Berikut adalah cara untuk mereset blingking pada EPSON TX210.
Langkah awal adalah memastikan bahwa printer tersebut adalah benar-benar blingking yang dimaksudkan di sini, yaitu point pada conter waste inkpad telah tercapai. Artinya printer dalam keadaan terkunci. Biasanya bisa dilihat dari layar display pada printer menunjuk angka ?.Cara lain bisa dipastikan dengan menggunakan software Resetter / Adjustment Program.
Download dulu softwarenya disini. Lalu simpan dan jalankan..
Langkah pertama akan muncul pilihan, klik OKuntuk melanjutkan.
 Akan muncul seperti gambar di atas, klik Select dan pilih port USB yang terhubung pada printer yang akan dikerjakan.

Pada halaman berikut, pilih pada Maintenance, Waste Inkpad Counter. Ini akan memberi informasi kepada anda status couter pada printer yang sedang dikerjakan. Beri centang pada Main lalu klik Read untuk membaca status counter.

Jika angka counter mendekati 100% atau lebih. Maka benar jika printer tersebut sedang dalam keadaan overload atau sering disebut blingking. Untuk melanjutkan proses Reset, ada baiknya anda periksa lagi kondisi pembuangan tinta. Jika anda menggunakan saluran pembuangan luar, tidak ada masalah untuk melanjutkan. Tapi jika tidak menggunakan saluran pembuangan luar maka printer harus dibongkar untuk penggantian absorber.
Selanjutnya untuk meresetnya ke 0% lagi lakukan centang kembali dan klik Initialization.
Adjustment Program meminta anda untuk mematikan printer. Cukup matikan tombol power saja tanpa harus mencabut aliran listrik. Tunggu hingga printer dalam keadaan off. Lalu tekan OK.
Nyalakan ulang printer, tunggu hingga printer dalam keadaan siap(lampu hijau menyala konstan, tidak berkedip). Lalu lakukan pembacaan counter seperti langkah di atas, dan pastikan angka counter telah 0 yang berarti bahwa printer telah bisa digunakan kembali.
Tutup program Adjustment. Selesai
TX210 Adjustment Program download link: http://www.ziddu.com/download/12745140/TX210.exe.html
Langkah awal adalah memastikan bahwa printer tersebut adalah benar-benar blingking yang dimaksudkan di sini, yaitu point pada conter waste inkpad telah tercapai. Artinya printer dalam keadaan terkunci. Biasanya bisa dilihat dari layar display pada printer menunjuk angka ?.Cara lain bisa dipastikan dengan menggunakan software Resetter / Adjustment Program.
Download dulu softwarenya disini. Lalu simpan dan jalankan..
Langkah pertama akan muncul pilihan, klik OKuntuk melanjutkan.


Pada halaman berikut, pilih pada Maintenance, Waste Inkpad Counter. Ini akan memberi informasi kepada anda status couter pada printer yang sedang dikerjakan. Beri centang pada Main lalu klik Read untuk membaca status counter.

Jika angka counter mendekati 100% atau lebih. Maka benar jika printer tersebut sedang dalam keadaan overload atau sering disebut blingking. Untuk melanjutkan proses Reset, ada baiknya anda periksa lagi kondisi pembuangan tinta. Jika anda menggunakan saluran pembuangan luar, tidak ada masalah untuk melanjutkan. Tapi jika tidak menggunakan saluran pembuangan luar maka printer harus dibongkar untuk penggantian absorber.
Selanjutnya untuk meresetnya ke 0% lagi lakukan centang kembali dan klik Initialization.
Adjustment Program meminta anda untuk mematikan printer. Cukup matikan tombol power saja tanpa harus mencabut aliran listrik. Tunggu hingga printer dalam keadaan off. Lalu tekan OK.
Nyalakan ulang printer, tunggu hingga printer dalam keadaan siap(lampu hijau menyala konstan, tidak berkedip). Lalu lakukan pembacaan counter seperti langkah di atas, dan pastikan angka counter telah 0 yang berarti bahwa printer telah bisa digunakan kembali.
Tutup program Adjustment. Selesai
TX210 Adjustment Program download link: http://www.ziddu.com/download/12745140/TX210.exe.html
Tanda kerusakan pada printer EPSON
Label:
Blingking,
printer
0
komentar
| INK/Paper LED | Power LED | Status | |
| OFF | OFF | Printer Off | |
| Blink(Slow) | ON | Low Ink(s) | |
| OFF | ON | Normal/Ready to Job | |
| OFF | Blink | Busy | |
| ON | ON | No Cartridge / Cartridge Error / No Paper | |
| Blink | OFF | General Error / Mechanic Error | |
| Blink(Slow) | OFF | Internal Error | |
| Blink | Blink | flip/flop | Waste Inkpad Full |
Manual Reset Canon IX4000/IX5000
To reset counter Canon PIXMA iX4000 or iX5000 you have to enter to service mode.
Procedure to enter to service mode on Canon PIXMA iX4000 or iX5000 is as following :
Connect the Canon PIXMA iX5000 or iX4000 printer to the power cord. ( note : If the
automatic power-on function is enabled in the printer, the printer enters the service
mode for the first time, but it will never enter the service mode if the printer is
turned off by the Power button. This is because the printer remains to be turned on
internally if the power is turned off by the Power button. To prevent this,
disconnection of the power cord is required before starting the printer in the service
mode ) .
With the Canon PIXMA iX5000 or iX4000 printer powered off, while pressing the Resume/
Cancel button, press and hold the Power button. (note : Don’t release the buttons.
The Power LED lights in green to indicate that a function is selectable.)
While holding the Power button, release Resume/Cancel button. (Don’t release the Power
button.)
While holding the Power button, press Resume/Cancel button 2 times, and then release
both the Power and Resume/Cancel buttons.
When the Power LED lights in green, press the Resume/Cancel button 4 times to reset
waste ink counter in the Canon Pixma iX5000 / iX4000. (note : If the Power LED does
not light in green the printer does not enter the service mode, disconnect the power
cord and plug it again. Then start from step 1 to start the printer in the service
mode again).
At the end of the service mode, press the Power button. The paper lifting plate of
the sheet feed unit will be raised.
Note :
Each time the Resume/Cancel button is pressed, the Alarm and Power LEDs light
alternately, Alarm in orange and Power in green, starting with Alarm LED.
Other specified number of time(s) according to the function listed in the table below.
Time(s) LED indication Function Remarks
0 times Green (Power) Power off
1 time Orange (Alarm) Service test print
2 times Green (Power) EEPROM information print
3 times Orange (Alarm) EEPROM initialization
4 times Green (Power) Waste ink counter resetting
5 times Orange (Alarm) Destination settings
6 times Green (Power) Print head deep cleaning (Cleaning of both black and color)
Procedure to enter to service mode on Canon PIXMA iX4000 or iX5000 is as following :
Connect the Canon PIXMA iX5000 or iX4000 printer to the power cord. ( note : If the
automatic power-on function is enabled in the printer, the printer enters the service
mode for the first time, but it will never enter the service mode if the printer is
turned off by the Power button. This is because the printer remains to be turned on
internally if the power is turned off by the Power button. To prevent this,
disconnection of the power cord is required before starting the printer in the service
mode ) .
With the Canon PIXMA iX5000 or iX4000 printer powered off, while pressing the Resume/
Cancel button, press and hold the Power button. (note : Don’t release the buttons.
The Power LED lights in green to indicate that a function is selectable.)
While holding the Power button, release Resume/Cancel button. (Don’t release the Power
button.)
While holding the Power button, press Resume/Cancel button 2 times, and then release
both the Power and Resume/Cancel buttons.
When the Power LED lights in green, press the Resume/Cancel button 4 times to reset
waste ink counter in the Canon Pixma iX5000 / iX4000. (note : If the Power LED does
not light in green the printer does not enter the service mode, disconnect the power
cord and plug it again. Then start from step 1 to start the printer in the service
mode again).
At the end of the service mode, press the Power button. The paper lifting plate of
the sheet feed unit will be raised.
Note :
Each time the Resume/Cancel button is pressed, the Alarm and Power LEDs light
alternately, Alarm in orange and Power in green, starting with Alarm LED.
Other specified number of time(s) according to the function listed in the table below.
Time(s) LED indication Function Remarks
0 times Green (Power) Power off
1 time Orange (Alarm) Service test print
2 times Green (Power) EEPROM information print
3 times Orange (Alarm) EEPROM initialization
4 times Green (Power) Waste ink counter resetting
5 times Orange (Alarm) Destination settings
6 times Green (Power) Print head deep cleaning (Cleaning of both black and color)
Manual Reset MP145
Service mode operation procedures -
1) With the printer powered off but connected to a power source, press the
Power button while pressing and holding
the Stop/ Reset button.
2) When the Power LED is lit, press the Stop/Reset button two times while
pressing and holding the Power button.
3) When releasing the Power button and the Stop / Reset button (regardless of
order), the printer will move into a
service mode. (Waiting for menu selection)
4) When the LED lights in green, press the Stop/Reset button the specified
number of time(s) according to the
function listed in the table below.(Each time the Stop/Reset button is pressed,
the LED lights alternately in
orange and green, starting with orange.)
The number of the Reset
button pressing
LED Function Remarks
0 time Green Power off
1 time Orange Service pattern print
2 times Green EEPROM print
3 times Orange EEPROM reset
4 times Green Waste ink counter reset See waste ink counter reset
procedures below.
5 times Orange Destination setting See Destination setting
procedures below.
6 times Green Print head deep cleaning
11 times Orange Button / LCD checking
12 or more times Returns to a menu selection
1) With the printer powered off but connected to a power source, press the
Power button while pressing and holding
the Stop/ Reset button.
2) When the Power LED is lit, press the Stop/Reset button two times while
pressing and holding the Power button.
3) When releasing the Power button and the Stop / Reset button (regardless of
order), the printer will move into a
service mode. (Waiting for menu selection)
4) When the LED lights in green, press the Stop/Reset button the specified
number of time(s) according to the
function listed in the table below.(Each time the Stop/Reset button is pressed,
the LED lights alternately in
orange and green, starting with orange.)
The number of the Reset
button pressing
LED Function Remarks
0 time Green Power off
1 time Orange Service pattern print
2 times Green EEPROM print
3 times Orange EEPROM reset
4 times Green Waste ink counter reset See waste ink counter reset
procedures below.
5 times Orange Destination setting See Destination setting
procedures below.
6 times Green Print head deep cleaning
11 times Orange Button / LCD checking
12 or more times Returns to a menu selection
EPSON Adjustment Program (Resetter) download Links
All Adjustment Program are no windows driver needed. No need to extract or change windows time or change anything. Just download, save on your harddrive and run the Adjustment Program. Enjoy!
EPSON T Series
EPSON T11
EPSON T13
EPSON T20E
EPSON T30
EPSON T40W
EPSON T50
EPSON T60
EPSON T1100(A3)
EPSON TX Series
EPSON TX101
EPSON TX111
EPSON TX200
EPSON TX210
EPSON TX300F
EPSON TX400
EPSON TX510
EPSON TX700
C Series:
EPSON Stylus C20/C40
EPSON Stylus C45
EPSON Stylus C58
EPSON Stylus C580
EPSON Stylus C60
EPSON Stylus C61
EPSON Stylus C63
EPSON Stylus C65
EPSON Stylus C67
EPSON Stylus C70/C80
EPSON Stylus C79
EPSON Stylus C82
EPSON Stylus C83/C84
EPSON Stylus C87
EPSON Stylus C90
EPSON Stylus C92
EPSON Stylus C110
CX Series:
EPSON CX1500
EPSON CX2800
EPSON CX3100
EPSON CX3500/3600/3650/4500/4600
EPSON CX3700
EPSON CX3900
EPSON CX4700
EPSON CX4900
EPSON CX5100
EPSON CX5500
EPSON CX5900
EPSON CX6500
EPSON CX6900F
EPSON CX7300
EPSON CX8300
EPSON CX9300F
EPSON R Series:
EPSON R210
EPSON R230
EPSON R250
EPSON R270
EPSON R290
EPSON R310
EPSON R350
EPSON R390
EPSON R800
EPSON R1800
EPSON RX Series:
EPSON RX420
EPSON RX510
EPSON RX640
EPSON RX630
EPSON RX650
EPSON RX700
EPSON SP/SC Series:
EPSON SC900
EPSON SC600/640/660
EPSON SP880
EPSON SP900
EPSON SP870/ SP1270(A3+)
EPSON SP890/ SP1280/ SP1290 (A3+)
EPSON SP1390(A3)
Canon Resetter Download Links
EPSON T Series
EPSON T11
EPSON T13
EPSON T20E
EPSON T30
EPSON T40W
EPSON T50
EPSON T60
EPSON T1100(A3)
EPSON TX Series
EPSON TX101
EPSON TX111
EPSON TX200
EPSON TX210
EPSON TX300F
EPSON TX400
EPSON TX510
EPSON TX700
C Series:
EPSON Stylus C20/C40
EPSON Stylus C45
EPSON Stylus C58
EPSON Stylus C580
EPSON Stylus C60
EPSON Stylus C61
EPSON Stylus C63
EPSON Stylus C65
EPSON Stylus C67
EPSON Stylus C70/C80
EPSON Stylus C79
EPSON Stylus C82
EPSON Stylus C83/C84
EPSON Stylus C87
EPSON Stylus C90
EPSON Stylus C92
EPSON Stylus C110
CX Series:
EPSON CX1500
EPSON CX2800
EPSON CX3100
EPSON CX3500/3600/3650/4500/4600
EPSON CX3700
EPSON CX3900
EPSON CX4700
EPSON CX4900
EPSON CX5100
EPSON CX5500
EPSON CX5900
EPSON CX6500
EPSON CX6900F
EPSON CX7300
EPSON CX8300
EPSON CX9300F
EPSON R Series:
EPSON R210
EPSON R230
EPSON R250
EPSON R270
EPSON R290
EPSON R310
EPSON R350
EPSON R390
EPSON R800
EPSON R1800
EPSON RX Series:
EPSON RX420
EPSON RX510
EPSON RX640
EPSON RX630
EPSON RX650
EPSON RX700
EPSON SP/SC Series:
EPSON SC900
EPSON SC600/640/660
EPSON SP880
EPSON SP900
EPSON SP870/ SP1270(A3+)
EPSON SP890/ SP1280/ SP1290 (A3+)
EPSON SP1390(A3)
Canon Resetter Download Links
Code Error canon MP145, MP150, MP160
Label:
Blingking,
Code Error canon MP145,
MP150,
MP160,
printer
0
komentar
ID: Code Error canon MP145, MP150, MP160 :
E2-2 = tidak ada kertas atau priter tidak bisa narik kertas (bisa karena roll kotor)
E3-3 = Paper jam
E4 = tidak ada tinta/cartridge
E5-5 = ink cartridges tidak terpasang atau cartirdge yang terpasang salah (tidak compatibel)
E8 = absorber full, atau platen waste ink absorber full mita direset
E9 = hubungan ke digital camera / video camera tidak support
E14 = Ink cartridges whose destination are wrong
E15 = Ink cartridge tidak terpasang
E16 - Ink remaining is unknown
E16 -E19 = masalah pada scan head alignment sheet
E22 = Carriage error
E23 = Paper feed erro
E24 = Purge unit error (bagian cleaning head)
E25 = ASF(cam) sensor error
E26 = Internal temperature rise error
E27 = ink absorber full or platen waste ink absorber full > reset dengan toolsnya
E28 = Ink cartridge temperature rise error -
E29 = EEPROM error
E33 = Paper feed position error
E35 15 = USB Host VBUD overcurrent error - USB
E37 17 = motor driver tidak normal
E40 20 = hardware lain error
E42 22 = Scanner error
E2-2 = tidak ada kertas atau priter tidak bisa narik kertas (bisa karena roll kotor)
E3-3 = Paper jam
E4 = tidak ada tinta/cartridge
E5-5 = ink cartridges tidak terpasang atau cartirdge yang terpasang salah (tidak compatibel)
E8 = absorber full, atau platen waste ink absorber full mita direset
E9 = hubungan ke digital camera / video camera tidak support
E14 = Ink cartridges whose destination are wrong
E15 = Ink cartridge tidak terpasang
E16 - Ink remaining is unknown
E16 -E19 = masalah pada scan head alignment sheet
E22 = Carriage error
E23 = Paper feed erro
E24 = Purge unit error (bagian cleaning head)
E25 = ASF(cam) sensor error
E26 = Internal temperature rise error
E27 = ink absorber full or platen waste ink absorber full > reset dengan toolsnya
E28 = Ink cartridge temperature rise error -
E29 = EEPROM error
E33 = Paper feed position error
E35 15 = USB Host VBUD overcurrent error - USB
E37 17 = motor driver tidak normal
E40 20 = hardware lain error
E42 22 = Scanner error
EPSON C4x Adjustment Program
 Ini adalah rilis terakhir yang telah support Epson C41SX, C41UX, C42SX, C42UX, C43SX, C43UX, C44, C45 dan C46. Kompatibel dengan OS Win9x/XP. File aslinya berupa sebuah folder yang berisi 4 file utama anatara lain Adjprog.exe, d4comm.dll, OsSwitch.dll, PrnDrvXP.dll, dan tambahan dari saya sebuah file ikon. Agar memudahkan pemakaian, saya jadikan beberapa file tersebut menjadi sebuah file .exe dengan menggunakan SFX Winrar.
Cara menggunakan Adjustment Program:
- Nyalakan printer dan koneksikan USB atau LPT printer.
- Download file adjustment program pada link diatas
- Buka file, tekan ok saat muncul pilihan.
- (lihat gambar diatas), pilih model name. Ini adalah seri printer yang akan di reset.
- Destination bisa pilih ESP/Asia Pasific
- Interface, pilih auto/pilih pilihan port yang terdeteksi pada komputer jika printer ada lebih dari satu.
- Tekan OK untuk masuk.
- Di Maintenance, pilih Waste Inkpad Counter
- Klik Read untuk membaca counter
- Klik Reset untuk mereset counter
- Selesai, klik Read lagi untuk memastikan prosentase counter telah 0(ESP) atau 250(Asia Pasicic)
Mengatasi e27 pada Canon MP198
Label:
Blingking,
reset
0
komentar
Cara Resetter Canon MP198 error E27
1. Printer dalam keadaan mati dan kabel listrik terpasang.
2. Tekan dan tahan STOP/RESET kemudian tekan dan tahan POWER.
3. Lepas tombol STOP/RESET (tombol POWER jangan dilepas)
4. Tekan STOP/RESET 2 (dua) kali, kemudian lepaskan tombol POWER
5. Biarkan Lampu Hijau blink / kelip2x sampai head printer berhenti bergerak. Dan LED panel menunjukkan angka NOL.
6. Komputer akan mendeteksi hardware baru, abaikan saja.....
7. Keadaan ini menunjukkan printer MP198 dalam keadaan SERVICE MODE dan siap direset.
DOWNLOAD PROGRAM RESETTER MP198 di SINI.
1. Exctract File Resetter MP198.
2. Siapkan 2 kertas di printer (ini untuk print pada waktu proses reset)
3. Jalankan program Resetter MP198.

4. Klik "MAIN", maka printer akan berproses, kemudian MP198 akan print satu halaman dengan tulisan " D=000.0 dan ...."
5. Klik " EEPROM Clear ".
6. Kemudian klik " EEPROM ", dan printer akan print hasil Resetter MP198. Salah satu barisnya tulisannya sbb:
"TPAGE(TTL=00000 COPY=00000)"
7. Matikan Printer dengan menekan tombol POWER.
8. Selesai...
Selamat mencoba ...
1. Printer dalam keadaan mati dan kabel listrik terpasang.
2. Tekan dan tahan STOP/RESET kemudian tekan dan tahan POWER.
3. Lepas tombol STOP/RESET (tombol POWER jangan dilepas)
4. Tekan STOP/RESET 2 (dua) kali, kemudian lepaskan tombol POWER
5. Biarkan Lampu Hijau blink / kelip2x sampai head printer berhenti bergerak. Dan LED panel menunjukkan angka NOL.
6. Komputer akan mendeteksi hardware baru, abaikan saja.....
7. Keadaan ini menunjukkan printer MP198 dalam keadaan SERVICE MODE dan siap direset.
DOWNLOAD PROGRAM RESETTER MP198 di SINI.
1. Exctract File Resetter MP198.
2. Siapkan 2 kertas di printer (ini untuk print pada waktu proses reset)
3. Jalankan program Resetter MP198.

4. Klik "MAIN", maka printer akan berproses, kemudian MP198 akan print satu halaman dengan tulisan " D=000.0 dan ...."
5. Klik " EEPROM Clear ".
6. Kemudian klik " EEPROM ", dan printer akan print hasil Resetter MP198. Salah satu barisnya tulisannya sbb:
"TPAGE(TTL=00000 COPY=00000)"
7. Matikan Printer dengan menekan tombol POWER.
8. Selesai...
Selamat mencoba ...
Langganan:
Postingan (Atom)